|
The Ohio State University
College of Mathematical & Physical Sciences
Department of Astronomy
|
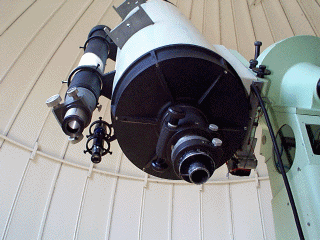
12-inch Tinsley Telescope
Startup & Shutdown Procedures
This document describes how to use the 12-inch Tinsley Reflecting Telescope
located on the roof of Smith Laboratory. The the Startup and Shutdown
procedures described here must be followed each time you use the telescope
to make sure that both observers and the telescope are safeguarded against
damage.
All of the thumbnail pictures below lead to full-sized, annotated versions.
Click on the images to see a detail of what is being discussed in the
text.
Startup Procedures
Please follow these procedures, in order, when opening up the telescope.
Click on the thumbnail image for a full-size, annotated version.
Make sure the weather is favorable before opening. If it is threatening
rain/snow/locusts, humidity is over 80%, or wind is enough to rattle the
dome, go home and get some sleep.
Power Up
The main clock drive power for the telescope is located inside the access
cover on the east pier of the telescope.

Turn the main power switch ON. It is located on the front of the ``blue
box'' inside the east side of the telescope mounting pier.

If you do not hear the clock drive motor come on (it makes a
buzzing/grinding noise), also throw the small switch located below the RA
circle on the south side of the telescope mount. The clock drive may be
toggled on and off while observing with this easier-to-reach external
switch.

Open The Dome
Please be very careful when opening the dome not to drive the door too
far up, as it could overrun the limit switch and get stuck in the open
position (which can be bad in unpredictable central Ohio weather).
The first step is to get power to the dome drive motors. To do this:
- Locate the slit power cord (it should be hanging from the dome).
- Plug this into the extension cord with the 8-pin connector
that is usually found coiled around the base of the
telescope mounting pier.
There are two knobby levers on a box located on the north side of the
telescope mounting pier:

The one on the left is used to Open/Close the slit, and the one on the
right rotates the dome left/right.
On the top of the dome shutter switch (left), there is a metal slide-plate
that must to clicked either to the right or the left, depending on
whether you want the the shutter to go UP (right) or DOWN (left).
The slit door is in 2 pieces:

an upper door about 2/3 of the length of the slit, and a detachable lower
door that covers the remaining third. Take a moment to familiarize
yourself with these two parts, and note where they join.
Whether you must open both doors or just the upper door depends on where
the objects are you wish to view:
- If viewing objects near the horizon, you need to make sure that
both the lower and upper slit doors are joined. The two are
joined via a spring-loaded "hook bar" operated with a pull-chain.

The hooks on either side of the lower door should be engaged with
the bar running along the base of the upper door, as shown above
(click on the thumbnail for detail of one of the hooks).
- If viewing objects near the zenith, you need to disengage the lower
slit door by having a second person pull the chain
down, releasing the bottom door (the two hooks will rotate away from
the bar on the upper door, disengaging it). While this person is
holding the chain down, you may open the dome door by moving
the switch to the UP position and holding it long enough for the
upper door to clear the lower door.
SHUTTER UPPER LIMIT!!!
While the dome is moving up TURN ON THE LIGHTS AND WATCH ITS
PROGRESS.
The shutter door is very heavy, and once it gets moving it can coast
as much as a foot before coming to rest after turning the
power off. If the door overshoots at the top, it can go past its
limit switch, leaving the door stuck open and unable to be shut except
by calling somebody to come in and fix the door!
Your marker for how high is high enough is a "D"-shaped handle located
about 6-inches above the base of the upper door:

Follow this as the dome rises. Once the D-bar gets within
1 FOOT of the top of the dome, SHUT OFF THE
POWER AND LET IT COAST. When the shutter is near the
maximum limit of its travel, it should look like this (shown here with
the lower door engaged for horizon viewing):

Please click on the above thumbnail image for a detailed, full-sized
version.
DO NOT OPEN THE DOME FURTHER THAN THE POSITION YOU SEE HERE
In general, it is not possible to observe objects directly overhead
without some occultation by the dome. Please wait for the objects to
transit and sink lower in the west to observe.
Rotating the Dome
Once the slit is opened, you can rotate the dome right or left
using the right-hand knobby lever on the north side of the telescope
mount. When moving the dome WAIT FOR IT TO STOP MOVING
COMPLETELY BEFORE REVERSING DIRECTIONS}. Failure to do so could
cause the dome rotation motor to burn out.
Removing the Mirror & Finer Scope Covers
Loosen the DEC axis clutch

and carefully (without forcing) swing the top
(aperture) of the telescope towards the North down towards the ground.
If you have to use force to rotate the telescope along the DEC axis, it
means the clutch is still engaged.
Unfasten the mirror cover by loosening the clutch knob on one side and pull the
cover off.

Also remove the cover on the large finder scope. Place both of these
face down on a (relatively) clean surface.
Point the scope back at the Zenith

and you are ready to start observing.
Note:
Do not remove the mirror cover until after the dome is open (otherwise,
dirt and crud can rain onto the mirror as the dome shutter opens).
Similarly, if you need to engage/disengage the lower slit door for
horizon/zenith viewing, replace the mirror cover before changing the
slit configuration.
Start of Observing
With the telescope pointing towards the Zenith, select eyepieces for
the main telescope and the large finder

Insert them into the eyepiece tubes, and lock both down using the thumb
screws on the side (they just need to be finger tight, not cranked down
hard).
To focus, find a bright star visually in the sky. Release the RA
clutch

and the Declination
Clutch so that the telescope can swing freely along either axis without
having to force it.
Locat a bright star visually (look out the door), then swing the scope around
until you can see the star in the small finder.
Put the star in the cross-hairs of the "little" finder, then center it in
the "big" finder, and finally look into the main eyepiece. Focus using the
rack and pinion knobs on either side of the eyepiece tube. You can lock
the focus by tightening the focus lock (only finger tight!).
Enjoy the night's observing!
Shutdown Procedures
- Put the telescope cover back on and point the telescope at the
Zenith, securing the RA and DEC axis clutches.
- Remove all of the eyepieces from the telescope and put them
away in their proper boxes.
- Move the dome so that the slit faces South.
- Close the slit, by switching to ``DOWN'' and hold the lever
in this position until the dome slit slams shut, engaging the auto
cutoff switch. This makes sure that the dome is sealed up reasonably
tight. Return the switch to the off position, unplug the power
cable, and coil the lower half around the telescope pier
hang it from the control panel.
- Turn off the power to the clock drive controller inside
the pier.
- Before leaving, listen for any noises. There should be no humming
or buzzing noises coming from the telescope.
- Clear away any chairs or ladders so that the entrance areas are
not blocked and lock the door behind you.
In Case of Emergency...
Do a quick assessment of the situation and make sure that it is really
a problem. If it is, the people to contact, in order, are:
- TBD for AY1999/2000
Return to the Astronomy TA Info Page
Updated: 1999 September 21 [rwp]